Surely, many of you have already heard and seen this abbreviation - it literally translates as Remote Desktop Protocol (RemoteDesktopprotocol). If someone is interested in the technical subtleties of this application layer protocol, they can read the literature, starting from the same Wikipedia. We will consider purely practical aspects. Namely, the fact that this protocol allows you to remotely connect to computers running Windows of various versions using the “Remote Desktop Connection” tool built into Windows.
What are the pros and cons of using the RDP protocol?
Let's start with the pleasant - with the pros. The advantage is that this tool, which is more correctly called ClientRDP, is available to any Windows user both on the computer from which the remote control is to be controlled, and to those who want to open remote access to their computer.
Through a remote desktop connection, it is possible not only to see the remote desktop and use the resources of a remote computer, but also to connect local drives, printers, smart cards, etc. to it. Of course, if you want to watch a video or listen to music via RDP, this process is unlikely to give you pleasure, because. in most cases you will see a slideshow and the sound will most likely be interrupted. But, the RDP service was not developed for these tasks.
Another undoubted advantage is that the connection to the computer is carried out without any additional programs, which are mostly paid, although they have their advantages. The access time to the RDP server (which is your remote computer) is limited only by your desire.
There are only two minuses. One significant, the other not so much. The first and essential one is that in order to work with RDP, the computer to which the connection is made must have a white (external) IP, or it must be possible to “forward” the port from the router to this computer, which again must have an external IP. It will be static or dynamic - it does not matter, but it should be.
The second minus - not so significant - the latest versions of the client no longer support the 16-color color scheme. The minimum is 15bit. This greatly slows down the work on RDP when you connect over the stunted-dead Internet at a speed not exceeding 64 kilobits per second.
What can you use remote access via RDP for?
Organizations, as a rule, use RDP servers for collaboration in the 1C program. And some even deploy user jobs on them. Thus, the user, especially if he has traveling work, can, in the presence of 3G Internet or hotel / cafe Wi-Fi, connect to his workplace remotely and resolve all issues.
In some cases, home users can use remote access to their home computer to get some data from home resources. In principle, the remote desktop service allows you to fully work with text, engineering and graphic applications. With the processing of video and sound for the above reasons - it will not work, but still - this is a very significant plus. And you can also view resources closed by company policy at work by connecting to your home computer without any anonymizers, vpn and other evil spirits.
We prepare the Internet
In the previous section, we talked about the fact that in order to provide remote access via the RDP protocol, we need an external IP address. This service can be provided by the provider, so we call or write, or go to your personal account and organize the provision of this address. Ideally, it should be static, but in principle, you can live with a dynamic one.
If someone does not understand the terminology, then the static address is permanent, and the dynamic one changes from time to time. In order to fully work with dynamic IP addresses, various services have been invented that provide dynamic domain binding. What and how, soon there will be an article on this topic.
We prepare the router
If your computer is not connected directly to the provider's wire to the Internet, but through a router, we will also have to perform some manipulations with this device. Namely - forward service port - 3389. Otherwise, your router's NAT will simply not let you inside your home network. The same applies to setting up an RDP server in an organization. If you don't know how to forward a port - read the article on How to forward ports on a router (opens in a new tab), then come back here.
We prepare the computer
In order to create the ability to remotely connect to a computer, you need to do exactly two things:
Allow connection in System Properties;
- set a password for the current user (if he does not have a password), or create a new user with a password specifically for connecting via RDP.
How to deal with the user - decide for yourself. However, keep in mind that non-server operating systems do not natively support multiple logins. Those. if you are logged in under yourself locally (console), and then log in under the same user remotely - the local screen will be blocked and the session at the same place will open in the Remote Desktop Connection window. Enter the password locally without exiting RDP - you will be kicked out of remote access, and you will see the current screen on your local monitor. The same thing awaits you if you log in as one user on the console, and remotely try to log in under another. In this case, the system will prompt you to end the local user session, which may not always be convenient.
So let's go to Start, right click on the menu Computer and press Properties.
In properties Systems choose Additional system settings

In the window that opens, go to the tab Remote access…

... press Additionally…

And put the only checkbox on this page.
This is a "home" version of Windows 7 - those who have Pro and above will have more checkboxes and it is possible to make access control.
Click OK everywhere.
Now, you can go to Remote Desktop Connection (Start>All Programs>Accessories), enter the IP address of the computer there, or the name if you want to connect to it from your home network and use all the resources.
Like this. In principle, everything is simple. If suddenly there are any questions or something remains unclear - welcome to the comments.
Quite often, many users who use remote access sessions have a question about how to change the RDP port. Now let's look at the simplest solutions, and also indicate several main steps in the configuration process.
What is the RDP protocol for?
First, a few words about RDP. If you look at the decoding of the abbreviation, you can understand that remote access
In simple terms, this is a terminal server or workstation tool. Windows settings (and any version of the system) use default settings that are suitable for most users. However, sometimes it becomes necessary to change them.
Standard RDP port: should it be changed?
So, regardless of Windows modification, all protocols have a preset value. This is RDP port 3389, which is used to carry out a communication session (connecting one terminal to remote ones).
What is the reason for the situation when the standard value needs to be changed? First of all, only with the security of the local computer. After all, if you figure it out, with a standard port installed, in principle, any attacker can easily penetrate the system. So now let's see how to change the default RDP port.
Changing settings in the system registry
We note right away that the change procedure is carried out exclusively in manual mode, and any reset or setting of new parameters is not provided in the remote access client itself.

First, we call the standard registry editor with the regedit command in the Run menu (Win + R). Here we are interested in the HKLM branch, in which we need to go down the partition tree through the terminal server directory to the RDP-Tcp directory. In the window on the right we find the key PortNumber. We need to change its meaning.
We go into editing and see 00000D3D there. Many are immediately perplexed about what it is. And this is just the hexadecimal representation of the decimal number 3389. To specify the port in decimal form, we use the appropriate display string for the value representation, and then specify the parameter we need.

After that, we reboot the system, and when we try to connect, we specify a new RDP port. Another way to connect is to use the special command mstsc /v:ip_address:XXXXX, where XXXXX is the new port number. But that's not all.
Windows firewall rules
Alas, the built-in Windows firewall can block the new port. So, you need to make changes to the settings of the firewall itself.

We call the firewall settings with advanced security options. Here you should first select incoming connections and click on the line for creating a new rule. Now we select the item for creating a rule for the port, then enter its value for TCP, then we allow the connection, leave the profile section unchanged and finally give the new rule a name, after which we press the button to complete the settings. It remains to reboot the server and, when connecting, specify the new RDP port separated by a colon in the corresponding line. In theory, there shouldn't be any problems.
RDP port forwarding on the router
In some cases, when a wireless connection is used rather than a cable connection, it may be necessary to do port forwarding on the router (router). There is nothing difficult in this.
First, in the system properties, we allow and specify users who have the right to do so. Then we go to the router settings menu through the browser (192.168.1.1 or at the end 0.1 - it all depends on the router model). In the field (if the main address is 1.1), it is desirable to indicate the address, starting from the third (1.3), and write the rule for issuing the address for the second (1.2).
Then, in network connections, we use the details view, where you should view the details, copy the physical MAC address from there and paste it into the router parameters.

Now, in the NAT settings section on the modem, enable the connection to the server, add a rule and specify the XXXXX port that needs to be forwarded to the standard RDP port 3389. Save the changes and reboot the router (the new port will not be accepted without a reboot). You can check the connection on some specialized site like ping.eu in the port testing section. As you can see, everything is simple.
Finally, note that the port values are distributed as follows:
- 0 - 1023 - ports for low-level system programs;
- 1024 - 49151 - ports allocated for private purposes;
- 49152 - 65535 - dynamic private ports.
In general, many users usually choose RDP ports from the third range of the list to avoid problems. However, both specialists and experts recommend using these values in tuning, since they are suitable for most of the tasks.
As for exactly this procedure, it is used mainly only in cases of Wi-Fi connection. As you can already see, with a regular wired connection, it is not required: just change the values of the registry keys and add rules for the port in the firewall.
RDP - Remote Desktop Protocol (Remote Desktop)
First of all, here we will talk about StandAlone Server. That is, about a separate - standing server. And not about domain controllers and corporate networks. (they just need highly qualified specialists)
A situation when a certain idea came to your mind and you decided to bring it to life. And for its implementation, you need a Server, which you rent in a certain data center.
You have chosen a suitable tariff, paid money, and now you already have a Server on which the software you need is installed. In most cases, Windows 2003 Server is sufficient for these trial projects. Completely cost effective and efficient.
Technical support will give you an IP address, Login and Password for RDP access, and you start your journey, full of ..., well, in general - it will not seem enough.
By default, we can say that this service in Windows is configured to give the user a lot of trouble and problems.
Although, of course - it works by itself and perfectly performs its function. But over time (sometimes it may be too late) the careless owner of a remote server will be horrified to realize what is really going on with his system and what a crowd of bloodthirsty people is standing around the walls of his fortress.
It's like turning off the infrared filter at the DVR and suddenly start seeing video sources - traffic police cameras with photo fixation, and signals from TV remote controls.
You begin to see and then perhaps understand.
On the one hand, software developers pretend that they make their systems for the average person, and you start to believe it.
But on the other hand, these same developers suggest that only a certified specialist can pick up the keyboard. And that the certificate was of this year.
Such is the paradox.
Let me tell you what it really looks like.
But in fact, hordes of coolhackers, after reading a dozen lines on the forums, download ready-made lists of servers with an open RDP port. And they start to break into your car. Some manually (but this is rare), but mostly with different programs, running dictionaries by enumeration: login - password. And no one limits them in anything. They are even cramped there at times.
Moreover, I'm looking at the logs, and I see that for the most part, these are the same dictionaries.
And your server is forced to fight back. And you don't know. And you don’t understand why your performance is low, why queries are being executed for a long time.
You are thinking big. Strategically, about functionality. And here — some kind of brakes are not clear.
Therefore, you will start optimizing memory, deleting temporary variables, defragmenting disks, etc.
And maybe even take a closer look at the "Events" tab in the management snap-in.
But I assure you that you will not see the reason there! Because it does not display attempts to enter an incorrect username and password. Perhaps you will even argue with other people that they don’t break you because they are afraid or respected.
No. I assure you, it's just that the developers are such fun guys. And initially they slightly outweigh the scales in the direction of darkness. They say that if these events were displayed, then the load on the server would be higher.
But here, it should only be noted that the first thing everyone should do is turn on this display. Although, of course, there are certain technological systems completely closed from the outside world, where no one ever hacks anything. But there, just such systems serve entire teams of pros.
So, let's, for starters, fix this situation and bring the system into a normal working form.
What will we do:
- Let's limit the number of allowed simultaneously open sessions.
(If you administer your remote server yourself, why do you need someone other than you to manage the server at the same time as you?
Although, one more may be needed - for example, for technical support. And more - why?) - And turn on the light. That is, let the system display failed login attempts in the Events snap-in.
And here you will be surprised. - We will prohibit access to the server from more than 3000 IP addresses, which, in fact, do nothing else but give people problems. Import Black List.
If you have nothing to do and make requests on the network about setting up RDP, you will find a lot of advice (and I myself was sure for a long time that they were very effective until I decided to conduct an experiment)
- Limit the number of failed login attempts allowed.
(If you are not drunk, then 3 times is enough for you to understand that the keyboard is in the wrong language and in the wrong register.) - Limit the time for these 3 attempts.
(You can, after all, 3 times a week, or you can - 3 times a second, and even multi-threaded. And because none of the coolhackers pokes at the keyboard with one finger for a long time choosing a letter, then there is decent traffic, which in 10 minutes, which the developers have determined, will have time to sort out several hundred, a couple of thousand combinations.) - Set a blocking time for entry in case you are drunk, or if - you are not you.
(Default - 3 minutes will not upset anyone. Let's set half an hour. Let them get tired of waiting.)
I confess that I was very happy when I found such articles, and immediately did everything right. I was sure that now you can focus on the project itself, and not worry too much about safety.
As there were tens of thousands of attempts during the day. (And I don't sit with my face on the monitor all day, but once a day I go to check the performance of my applications) And so it remained.
And I still couldn’t understand how it was so, so I see that I have 3 attempts set up and then a blockage for 30 minutes. And this bot has been playing for six hours tirelessly going through logins from “Administrator” to “ferapont”.
But everything was not leisure. And then - I set everything up, which means - it should work!
Once, I had to transfer one of my projects from one server to another, due to the failure of the RAID array. And the old server was available to me for some time, but it was safe to try to conduct dangerous and not very experiments on it. So I decided to check it out.
To do this, for several minutes I tried to log in with the wrong password, expecting that now the authentication system would block me. Figushki. Nothing happened.
I spent a couple of days studying this problem in more detail. I plunged into manuals and meager comments. Everyone as one assures on the forums - this method is super effective.
And this is what I'm going to tell you now:
- firstly, this method only works under a domain controller (don't know what it is? Spit - you don't need it) and for a standalone server, you need to dive into special knowledge and learn spells.
- secondly, it turns out, and apparently many mistakenly and naively assume otherwise (like myself), that when such a mechanism is implemented, the one who tries to enter will be blocked.
No, just not him. And you will be blocked!
Yes - it is your account that will be blocked for the time that you registered there. And you yourself will never be able to enter your own server!
Leaving the house and locking the door, I will break the lock. I'll freeze my ears - to spite Grandma.
But I think that parting with such illusions was worth a couple of days of torment.
Done with the preamble. Let's get down to business.
1. Limit the number of allowed simultaneous open sessions.
Find and open the Terminal Services Configuration snap-in:
In this snap-in, select open the RDP-Tcp tab in the "properties", where we limit "Msximum Connections" to 2x, for all network adapters.
Click OK. Now, only one more person can enter at the same time as you. And without you, everyone who wishes will have to line up in twos.
Next up, you sons of bitches!
2. Turn on the display of failed login attempts in the Events snap-in.
We find and open the “Local Security Settings” snap-in and in it - the section: “Audit Policy”:
And change the property values of all the "Audit" entries - as shown in the screenshot. You will then need to reboot for the changes to take effect.
You can wait and after a few hours look at the now real picture in order to comprehend what kind of world we live in and who really surrounds us.
3. We prohibit access to the server from 100% malicious IP addresses. Import Black List.
Here you have 2 options:
- Fast and all at once.
- Manual, with an understanding of what exactly you are doing.
Fast way.
After that, you should have something like this:
Manual way, with understanding.
- First, you need to create an additional policy. Open the "Local Security Settings" snap-in.
- You select the section "IP Security Policies on Local Computer" and right-click: "Create IP Security Policy ..." you launch the Configuration Wizard.
- Come up with a name for the new Rule. For example: "Block IP".
- Next, click on all the questions and at the end you will have a form for editing the properties of the Policy.
- Adding a new Rule. Click . and if the Wizard checkbox is checked, then another Wizard will start, the questions of which must be answered.
- Tunnel end point. press
- network type. There is already "All network connections". press
- IP Filter List.
Adding a new filter. We press and come up with a meaningful Name.
For example: Block brute forcing IP.
The list is still empty. We keep it as is.
Remote Desktop Services (RDS) in Windows Server 2008 R2 is not just a rebrand of its predecessor, Terminal Services. New features, some of which appeared in Windows Server 2008, such as RemoteApp, RD Gateway and RD Virtualization Host, make it easy and convenient to ensure the deployment and operation of both individual user applications and entire desktops in RDS and VDI solutions, and the functionality and convenience is no worse than that of Citrix solutions or complexes of other vendors.
But what about the security of Remote Desktop Services? Microsoft has significantly updated and strengthened the security of this service. In this article, we will talk about the security mechanisms of RDS, how to secure terminal services using group policies, and about the practical aspects of securing RDS solutions.
What's new in R2
If you have ever worked with Windows Server 2003 and Windows Server 2008 versions of Terminal Services, you probably remember that Windows 2008 introduced a number of new features, such as (browser connection), (Internet access to Terminal Services), (publishing individual applications over the RDP protocol) and service (ensuring load balancing).
Windows Server 2008 R2 introduced the following features:
- Remote Desktop Virtualization for VDI Solutions
- RDS Provider for PowerShell (Administrator can now manage RDS configuration and management from the command line or via scripts)
- Remote Desktop IP Virtualization, which allows you to assign IP addresses to connections based on the parameters of the session or the application being launched
- New version of RDP protocol and Remote Desktop Connection (RDC) client - v. 7.0
- CPU resource management to dynamically allocate CPU resources based on the number of active sessions
- Compatibility with Windows Installer, which allows you to install programs with the ability to additionally configure application settings on the user's side.
- Client-side support for up to 16 monitors.
In addition, the functions of working with video and audio have been improved, and full support for Windows Aero technology (note that Aero is not supported in multi-monitor mode).
Naturally, RDS security issues depend on the specific solution. For example, if you publish a desktop for users connecting via the Internet or using a browser, then the security issue is much more acute than with the standard solution, when clients connect using an RDC client over a local area network (LAN).
Network Level Authentication
To provide greater security for all connections, you must enable the Network Level Authentication (NLA) authentication mechanism. The NLA requires the user to log in to the RD Session Host before the session is created. This mechanism allows you to protect the server from processing unnecessary sessions that can be generated by intruders or bot programs. In order to use NLA, the client operating system must support the Credential Security Support Provider (CredSSP), which means Windows XP SP3 () and above, and an RDP 6.0 client or above.
You can configure NLA on the RD Session server by opening the Administrative Tools -> Remote Desktop Services -> Desktop Session Host Configuration console.
- Right click on connection
- Select Properties
- Go to General tab
- Check the option “Allow connections only from computers running Remote Desktop with Network Level Authentication”
- Click OK.
Transport Layer Security (TLS)
An RDS session can use one of three security mechanisms to secure the connection between clients and the RDS Session Host:
- RDP security layer– Uses built-in RDP encryption, is less secure.
- Negotiate– TLS 1.0 (SSL) encryption will be used if supported by the client, if the client does not support it, normal RDP security will be used.
- SSL– TLS 1.encryption will be used to authenticate the server and encrypt the data transmitted between the client and the server. This is the most secure mode.
For a high level of security, you must use SSL/TLS encryption. For these purposes, you must have a digital certificate, it can be self-signed or issued by a CA certificate authority (which is preferable).
In addition to the security level, you can select the encryption level for the connection. The following types of encryption are available:
- Low– 56-bit encryption of data sent from the client to the server is used. Data transmitted from the server to the client is not encrypted.
- Client Compatible– this type of encryption is used by default. In this case, all traffic between the client and the server is encrypted with the maximum key length that the client supports.
- high– all data transmitted between the client and the server in both directions are encrypted with a 128-bit key
- FIPS Compliant– all data transmitted between the client and the server in both directions are encrypted using the FIPS 140-1 method.
It is worth noting that if High or FIPS Compliant encryption levels are used, then all clients that do not support this type of encryption will not be able to connect to the server.
You can configure the server authentication type and encryption level as follows:
- On the RD Session Host server, open the Remote Desktop Session Host configuration window and go to the properties window.
- On the General tab, select the desired security level and encryption type from the drop-down menus.
- Click OK.

Group Policies
There are a number of Group Policy options for configuring RDS settings in Windows Server 2008 R2. All of them are located in the Computer Configuration\Policies\Administrative Templates\Windows Components\Remote Desktop Services section (a screenshot of the Group Policy Management Console is shown in the picture). 
As you can see, there are licensing management policies, RDC client configuration policies and the RD Session Host server itself. RD Session Host security policies include:
- Set Client Connection Encryption Level: policy is used to control the level of encryption. If enabled, all connections must use the specified encryption level (default is High).
- AlwaysPromptforPassworduponconnection: this policy is used if you want to always ask for the user's password when connecting to an RD session, even if the password was entered in the RDC client. By default, users can automatically log into a session if they provide a password in the RDC client.
- RequiresecureRPCcommunication: - when the policy is enabled, only authenticated and encrypted requests from clients are allowed.
- RequireuseofSpecificsecuritylayerforRemote (RDP) Connections: when the policy is enabled, all connections between the client and the terminal server must use the security level specified here (RDP, Negotiate, or SSL/TLS)
- DoNotallowLocalAdministratorstoCustomizePermissions: The policy disables the ability for administrators to configure RD Session Host security settings.
- Require User Authentication for Remote Connections by using Network Level Authentication: The policy includes an NLA requirement for all terminal server connections (clients without NLA support will not be able to connect).
RDC client settings are located under the subsection RemoteDesktopconnectionclient:
- Donotallowpasswordstobesaved: policy prohibits saving passwords in the RDC client, the "Save password" option becomes unavailable, all previously saved passwords will be deleted.
- SpecifySHA1 thumbprintsofcertificatesrepresentingtrusted.rdppublishers: this policy allows you to create a list of SHA1 thumbprints of certificates, and if a certificate matches the thumbprint in this list, it is considered trusted.
- Promptforcredentialsontheclientcomputer: The policy enables prompting for user credentials on the client computer, not the RD Session server.
RD Web Access
Users of computers that do not have the RDC client installed can access published applications using a web browser. To do this, the user must open the URL in the browser where the RDS resources are published. The RD Web Access Server is a separate role of the RD server, usually located on a dedicated server.
The web interface of the RD Web Access server is based on SSL and users can log in with their credentials. Authenticated users see only a list of those published programs (RemoteApp) to which they have access.
The Web Access server uses an X.509 certificate for encryption. The default is a self-signed certificate.
Network Layer Security (SSL) RDP is unfortunately not widely adopted by system administrators who prefer to secure terminal connections in a different way. Perhaps this is due to the apparent complexity of the method, but this is not so, in this material we will consider how to organize such protection simply and without difficulty.
What are the benefits of securing RDP with SSL? First, strong channel encryption, certificate-based server authentication, and network-level user authentication. The latter feature is available starting with Windows Server 2008. Network Level Authentication improves the security of the Terminal Server by allowing the authentication to occur before the session even starts.
Network Level Authentication occurs before connecting to Remote Desktop and displaying the login screen, which reduces the load on the server and greatly increases its protection against intruders and malware, as well as reduces the likelihood of denial of service attacks.
To take full advantage of RDP over SSL, client PCs must be running Windows XP SP3, Windows Vista, or Windows 7 and use RDP client version 6.0 or later.
When using Windows Server 2003 SP1 and later, SSL (TLS 1.0) channel encryption and server authentication will be available, client PCs must have RDP client version 5.2 or later.
In our article, we will consider setting up a terminal server based on Windows Server 2008 R2, however, everything said will be true for Windows Server 2003 (except for the missing features).
For the successful implementation of this solution, your network must have a working certificate authority, the configuration of which we considered in. To trust the certificates issued by this CA on the terminal server, you must install the CA certificate (or chain of certificates) in the .
You should then request a server authentication certificate with the following parameters:
Name - the full name of the terminal server (i.e. server.domain.com if the server belongs to the domain.com domain)
- Certificate type - Server authentication certificate
- Set option Create a new set of keys
- CSP- Microsoft RSA Channel Cryptographic Provider.
- Check box Mark key as exportable.
- For an enterprise CA, check the box Use the computer's local storage for the certificate. (This option is not available in a standalone CA.)
Send a request to the CA and install the issued certificate. This certificate must be installed in the computer's local store, otherwise it will not be able to be used by Terminal Services. To check this, run the console MMC (Start - Run - mmc) and add snap Certificates(File - Add or remove snap-in) for the computer account.
In console root select click View - Options and set view mode Organize certificates by purpose. The issued certificate must be in the group Server authentication.
If you received the certificate using a standalone (standalone) CA (the network does not have a domain structure), then by default it will be installed in the user account store and you will have to perform a number of additional steps.
open Internet Explorer - Internet Options - Content - Certificates, the issued certificate must be installed in the store Personal.
Do an export. When exporting, specify the following options:
- Yes, export private key
- Delete private key after successful export
Then delete the certificate from this store. in a snap Certificates (local computer) Choose a section Server authentication, right click on it All Tasks - Import and import the certificate.
Now in Administration - Remote Desktop Services open Remote Desktop Session Host Configuration(in Windows Server 2003 Administrative Tools - Configuring Terminal Services).
Select the required connection and open its properties. Click the button at the very bottom Choose and select the certificate obtained in the previous step (in Windows Server 2003 this window looks a little different).
 After selecting the certificate, specify the rest of the properties:

- Security Level SSL
- Encryption level High or FIPS-compatible
- Check box Only allow connections from computers...(not available on Windows Server 2003)
Save the entered parameters, this completes the server setup.
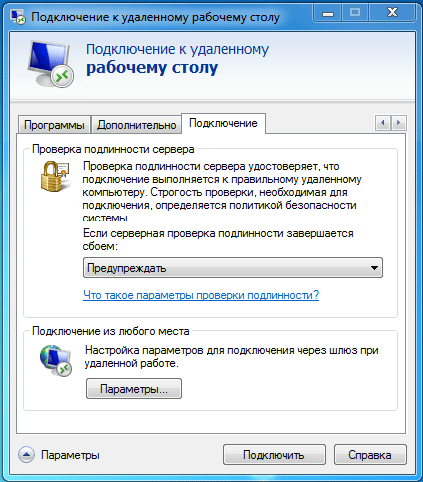
On the client PC, create a remote desktop connection, use the fully qualified server name that is specified in the certificate as the address. Open the connection properties and on the tab Connection - Server Authentication set option Warn.
 In order for this PC to trust the certificates issued by our certificate authority, do not forget to install a CA certificate on it in the store Trusted Root Certification Authorities.
On Windows 7 (when using RDP client version 7), this certificate must be installed in the store computer account, to do this, import it through the snap Certificates (local computer) in the MCC console, in the same way as it was done above. Otherwise, the connection will fail and you will receive the following error:
 After installing the CA certificate, you can try to connect, please note that you will be prompted to enter a username and password even before creating an RDP session. If the connection is successful, pay attention to the lock in the window title, which indicates that you are working via SSL. By clicking on it, you can view information about the certificate.
And finally, a drop of tar in a barrel of honey. Windows Terminal Services does not know how to authenticate connecting clients, so if necessary, additional security methods should be used, such as an SSH tunnel or IPSec VPN.